
News/Archiv
2003
Erstes CADSD-Instrument - Baubeispiel / 03.11.2003
Im Folgenden ist der Bau des ersten CADSD-Didgeridoos dokumentiert. Ich war an einem Dis mit einem leicht anspielbaren 1.Overblow bei F (also eine Oktave + einen Ton über dem Grundton) interessiert. Der Gegendruck sollte so gewählt werden, dass eine schnelle, druckvolle Spielweise möglich ist. Außerdem sollte beim Spielen des Grundtones mindestens ein Sington wahrnehmbar sein.
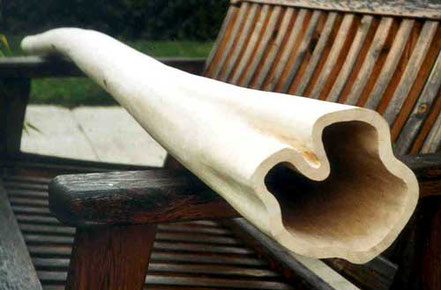
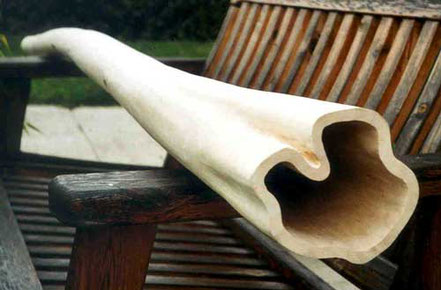
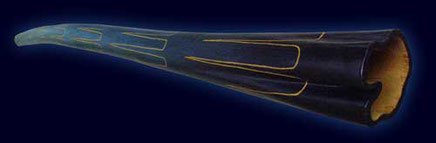
Als Ausgangsmaterial stand ein Weißdornstamm mit ca. 1,80 m Länge und einer eigenwilligen Einfaltung am zukünftigen Bell-End zur Verfügung.
Nach ca. 75 verschiedenen Simulationsrechnungen am Computer hatte ich eine Innenform, die zu der gewünschten Klang- und Spielcharakteristik führen sollte.
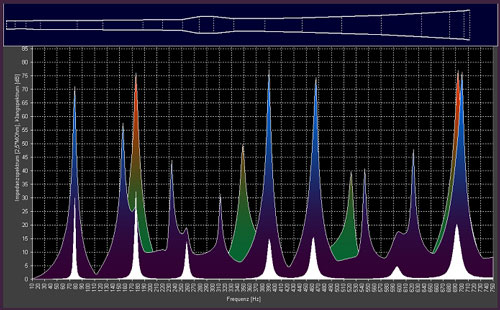
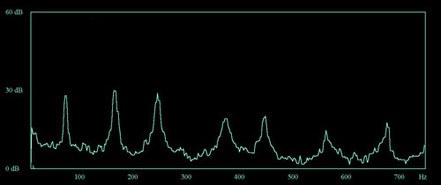
Simulation der gewünschten Didgeridoo-Innenform mit Grundton Dis (1.weißer Peak) und gut anspielbaren 1.Overblow F (2.weißer Peak). Die verstärkten 4. und 5. Obertöne (blau) im Klangspektrum des Grundtones sind deutlich zu erkennen und sollten als Singtöne hörbar sein.
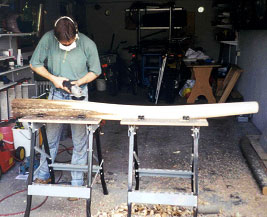
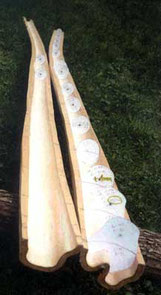
Nach der von Kay beschriebenen Baumethode hatte ich dann die grobe Außenform herausgearbeitet, diesen Rohling mit Holzleim versiegelt und bei einem mir gut bekannten Schreiner mit einer Bandsäge aufsägen lassen.
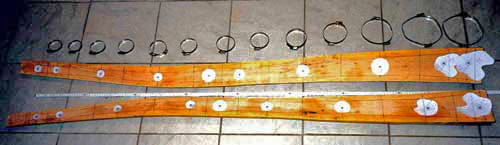
Danach wurden nach Vorgaben aus den Simulationsrechnungen und der eigenwilligen Form des Weissdorn-Rohlings die Bauschablonen aus Papier hergestellt und die Maße auf die beiden Hälften übertragen.


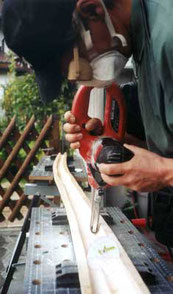
Der aufwändigste Arbeitsschritt war dann das millimeter-genaue Herausarbeiten der berechneten Innenform auf Basis dieser Schablonen mit Hilfe von Woodcarver, Beiteln und Powerfeile.
Die beiden fertigen Hälften wurden dann gedübelt, unter kontrollierten Bedingungen verleimt und nach endgültiger Trocknung geschliffen.


Die inneren Oberflächen sind mehrfach mit geeigneten natürlichen Ölen behandelt.
Als Motiv für die Bemalung habe ich einen Teil des simulierten Grundton-Klangspektrums gewählt.
Damit war zumindest der Bau dieses Instrumentes erfolgreich abgeschlossen.

Nun kam die Stunde der Wahrheit!
Würde sich das neue Didge auch so spielen lassen und klingen wie geplant? Spielbarkeit und Gegendruck entsprachen jedenfalls voll den Erwartungen.
Ein Gegencheck mittels akustisch analysierter FFT-Messungen zu den simulierten Klangspektren sollte alles Weitere zeigen.
Vergleich der praktischen FFT-Messungen mit den Simulationen
Am schwierigsten ist es, das akustische Eingangsimpedanzspektrum zu messen. Ich habe leider nicht die experimentellen Möglichkeiten dafür. Als Kompromiß kann man aber mit der flachen Innenhand
auf das Mundstück schlagen und alle Eigenresonanzen der Luftsäule im Didgeridoo zum Schwingen anregen. (Dabei ist darauf zu achten, dass nach dem Anschlagen die Handfläche das Mundstück
verschlossen hält.) Das über diese Technik analysierbare Frequenzspektrum gibt zumindest die Lage bzw. Frequenzen der Overblows an. Da aber die Höhe der Impedanzpeaks etwas über den akustischen
Gegendruck aussagt, ist dieser nur subjektiv über Spielversuche überprüfbar.

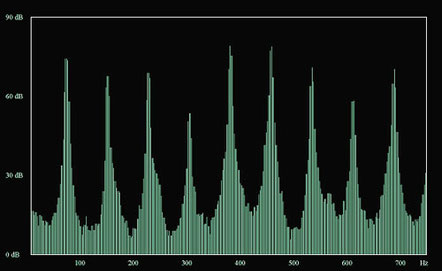
Analysiertes FFT-Spektrum der durch Aufschlagen mit der flachen Hand auf das Mundstück angeregten Eigenresonanzen der Luftsäule.
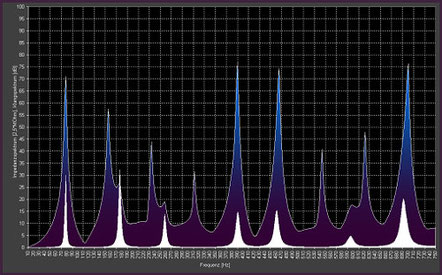
weiße Peaks: simuliertes Eingangsimpedanzspektrum (Grundton und Overblowreihe)
blau-violettes Spektrum: simuliertes Klangspektrum des Grundtones
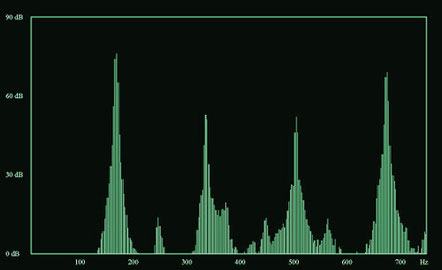
Wie man erkennen kann, wurde eine relativ gute Übereinstimmung mit den Frequenzen der weißen simulierten Impedanzpeaks erreicht. Auch die folgende Messung des Klangspektrums beim Spielen des Grundtones zeigt eine zufriedenstellende Übereinstimmung.
Wenn man berücksichtigt, dass ich in der Simulation bewußt die Höhenunterschiede der Peaks verstärkt habe (Das erleichtert die Erkennung von Einflüssen bei der Projektierung.) ist die Übereinstimmung beeindruckend.
Wer schon einmal FFT-Spektren aufgenommen hat, wird wissen, wie empfindlich z.T. die Ausprägung der Formen auf Änderungen im Lippenvibrationsverhalten reagieren.

Analysiertes FFT-Klangspektrum beim Spielen des Grundtones

Im Weiteren zeigt auch die Vermessung des FFT-Klangspektrums beim Spielen des 1.Overblows eine verblüffende Übereinstimmung mit der Simulation.
weiße Peaks: simuliertes Eingangsimpedanzspektrum (Grundton und Overblowreihe)
orange-grünes Spektrum: simuliertes Klangspektrum des 1.Overblows

Analysiertes FFT-Klangspektrum beim Spielen des 1.Overblows
Fazit:
Ich selbst bin immer wieder beeindruckt wie relativ genau die Spiel- und Klangcharakteristiken von komplexeren Didgeridoo-Innenformen physikalisch simulierbar/berechenbar
sind.
==> CADSD ist keine trockene Theorie, sondern wirklich erfolgreich in der Praxis umsetzbar/anwendbar.
First CADSD-Instrument - Crafting example / 03.11.2003
The following documents the making of the first CADSD didgeridoo. I was interested in a D# with an easy first toot on F (i.e. the toot is an octave + one note above the drone). The back-pressure was to be chosen so that a fast, percussive playing technique was possible. Also, when the drone was played, at least one singing tone should be clearly audible.
The starting material was a hawthorn log about 1.80 metres long with a peculiar fold in the future bell-end.

After about 75 different computer simulations I had an inner form that should lead to the desired sound and playing characteristics.
Simulation of the desired internal didgeridoo form with a D# drone (1st white peak 77,8 Hz) and easily playable first toot on F (2nd white peak 174,6 Hz). The strengthened 4th and 5th overtones in the blue sound spectrum of the drone are clearly visible and should be audible as "singing" tones. The orange-green sound spectrum comes when the first toot is played.
Following the building instructions described by Kay, I then shaped the approximate external form, sealed the outside with wood glue and had a cabinet maker I know well cut it down the middle with a bandsaw.
After that and using criteria determined by the simulations and the unique shape of the hawthorn workpiece, building templates were made of paper and the measurements transferred to the two halves.
The most complex work step was the millimetre-precise working of the calculated internal form on the basis of the templates with the aid of woodcarver, chisels and power file.
The two halves were then doweled, glued under controlled conditions, and after final drying, sanded down.
The inner surfaces were treated several times with natural oils.
I chose a part of the simulated drone sound spectrum as the motif for the painting. So, at least the construction of this instrument had been successfully completed.
Now came the moment of truth!
Could the didge be played and would it sound as planned?
Playability and back-pressure were fully up to expectations at least.
A reverse-check by means of acoustically analysed FFT measurements of the simulated sound spectra would show everything else.
Comparison of the actual FTT measurements with the simulations
The most difficult measurement to make is the acoustic input impedance spectrum. Unfortunately I lack the experimental facilities for this. As a compromise one can, however, slap a flat hand on the mouthpiece to encourage all the inherent resonances of the air column in the didgeridoo to appear. (After slapping, the flat of the hand must keep the mouthpiece closed.) The frequency spectrum analysable by this technique indicates at least the location and frequencies of the toots. But because the height of the impedance peaks expresses something about the acoustic back-pressure, this can only be tested subjectively by playing.
Analysed FFT spectrum of inherent resonances of the air column stimulated by slapping the flat of the hand on the mouthpiece.

White peaks: simulated input impedance spectrum (drone and toot sequence)
Blue-violet spectrum: simulated sound spectrum of the drone
As can be seen, a relatively good match with the frequencies of the black simulated impedance peaks was achieved. The following measurement of the sound spectrum when playing the drone also shows a satisfactory match.
When one considers that in the simulation I deliberately strengthened the height differences between the peaks (for easier recognition of influences of the projection), the match is impressive.
Anyone who’s done FFT spectra will know how sensitively the definition of the forms react to changes in the behaviour of lip vibrations.
Analysed FFT sound spectrum when playing the drone
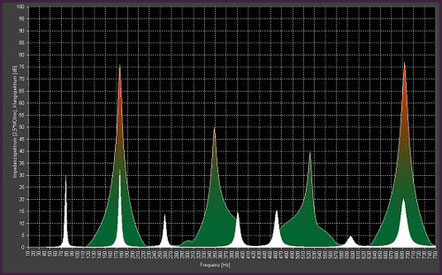
In addition, the measurement of the FFT sound spectrum when playing the first toot shows an astounding match with the simulation.
White peaks: simulated input impedance spectrum (drone and toot sequence)
Blue-violet spectrum: simulated sound spectrum of the 1st toot
Analysed FFT sound spectrum when playing the 1st toot
Summary
I keep being amazed at how relatively precisely the playing and sound characteristics of more complex didgeridoo inner shapes can be simulated and calculated.
==> Computer Aided Didge Sound Design (CADSD) is no dry theory, but can really be used successfully in practice.