
News/Archiv
2021
-
3D-Druck / Springbockhorn bringt neue Erkenntnisse
/ Kay Reimer + Frank Geipel 20.05.2021
3D-Druck / Springbockhorn bringt neue Erkenntnisse / 20.05.2021
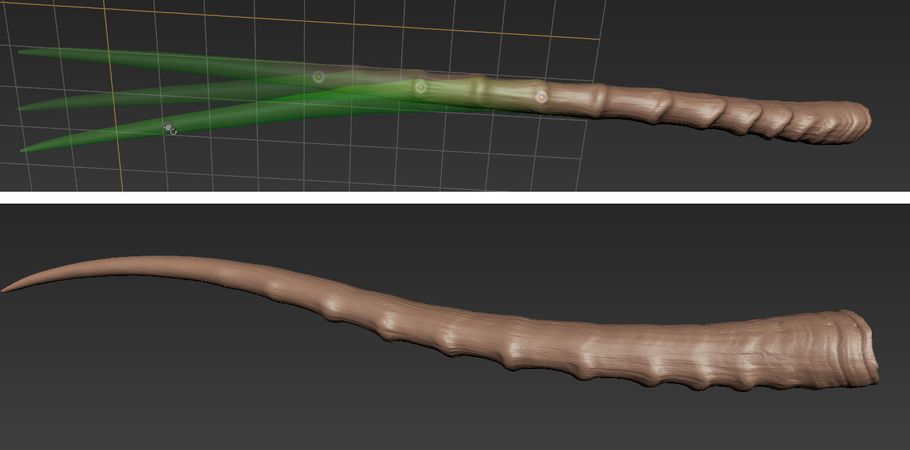
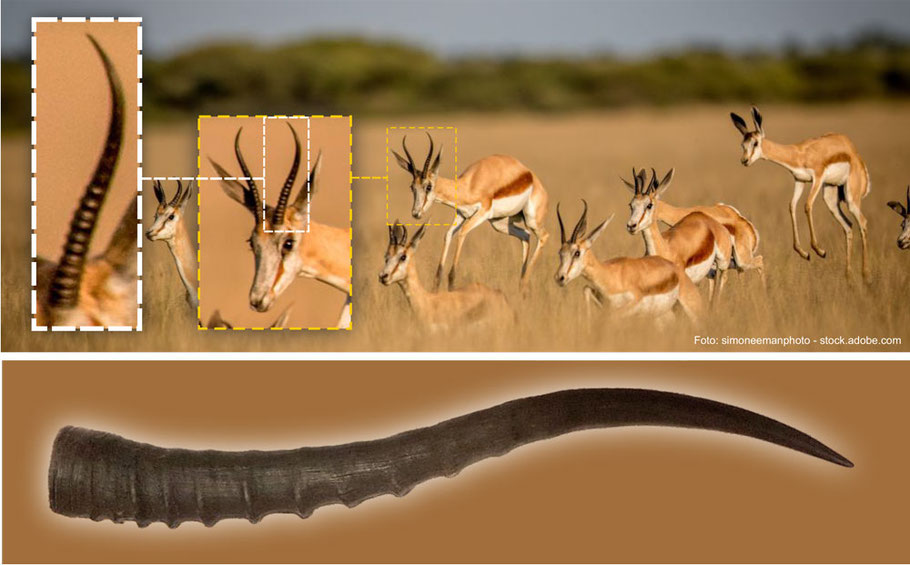
Mein neuer 3-Druck sollte am Ende so aussehen wie das Horn einer fiktiven Urzeitantilope (Maßstab ca. 6:1 im Vergleich zu lebenden Exemplaren) - CADSD optimiert, versteht sich. Nach kurzem, intensiven Studium der allgemeinen Hornvielfalt habe ich mich für ein Springbockhorn entschieden. Ein altes Original für den 3D-Scan war schnell gefunden.

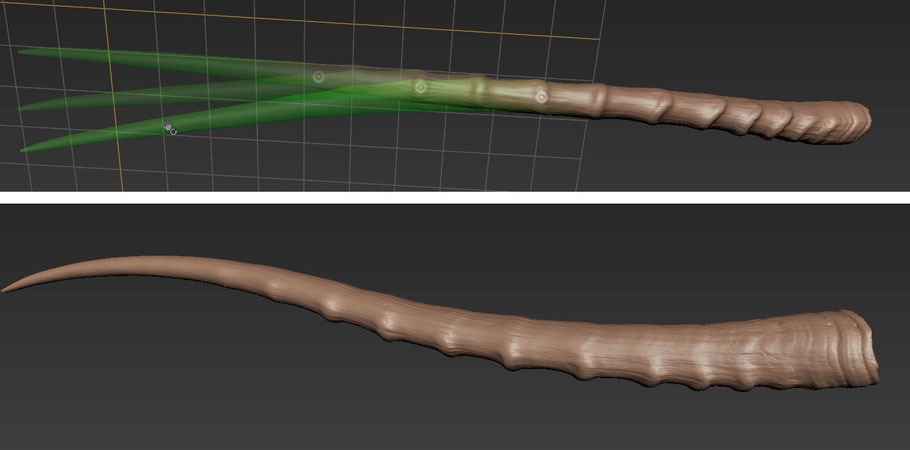
Nach ein paar Modifikationen erschien mir der Scan optimal für den Bau eines Didgeridoos geeignet - die Anpassungen für den Instrumentenbau beschränkten sich auf eine Längenskalierung und die Begradigung eines aus der Ober-/Untersicht gebogenen Bereiches. Die Seitensicht und die komplette Oberflächenstrucktur blieb unverändert. Einzig am Bell waren geringe Überarbeitungen nötig.
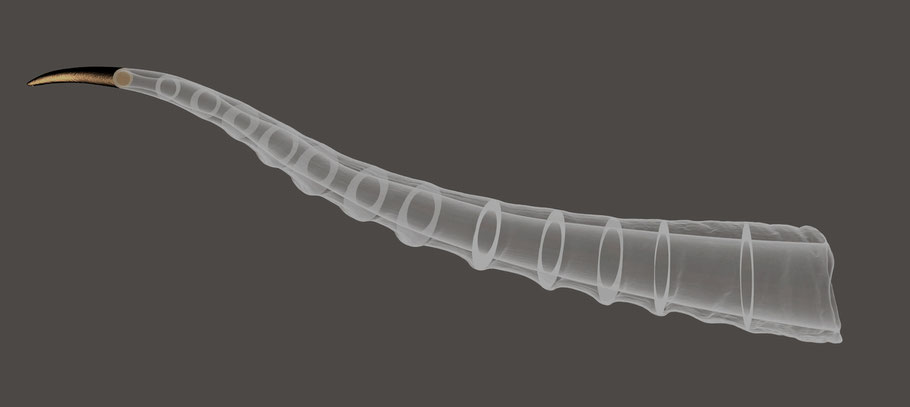
Die Außenform wurde so angelegt, dass die geplante CADSD-Innenform zuzüglich einer Minimalwandstärkte von 8mm genau hineinpasste. Interessant könnte für einige Leser der Hinweis sein, dass Innenformen ohne Kangspektrumveränderungen gebogen werden können. Entscheidend ist dabei, dass Gelenke im Zentrum der jeweiligen Querschnitte liegen.
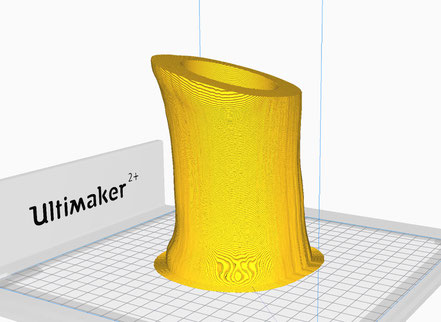

Der 3D-Druck mit dunkelbraunem Bio-PLA erfolgte wie üblich in mehreren Teilen, Schichthöhe diemal: 0,15mm. Die Füllung habe ich je nach Wandstärke und Belastung der Verbindungsflächen zwischen 60% bis 100% angepasst. Alle Kontaktflächen wurden nachträglich mit Bohrungen für optimale Klebeverbindungen präpariert.
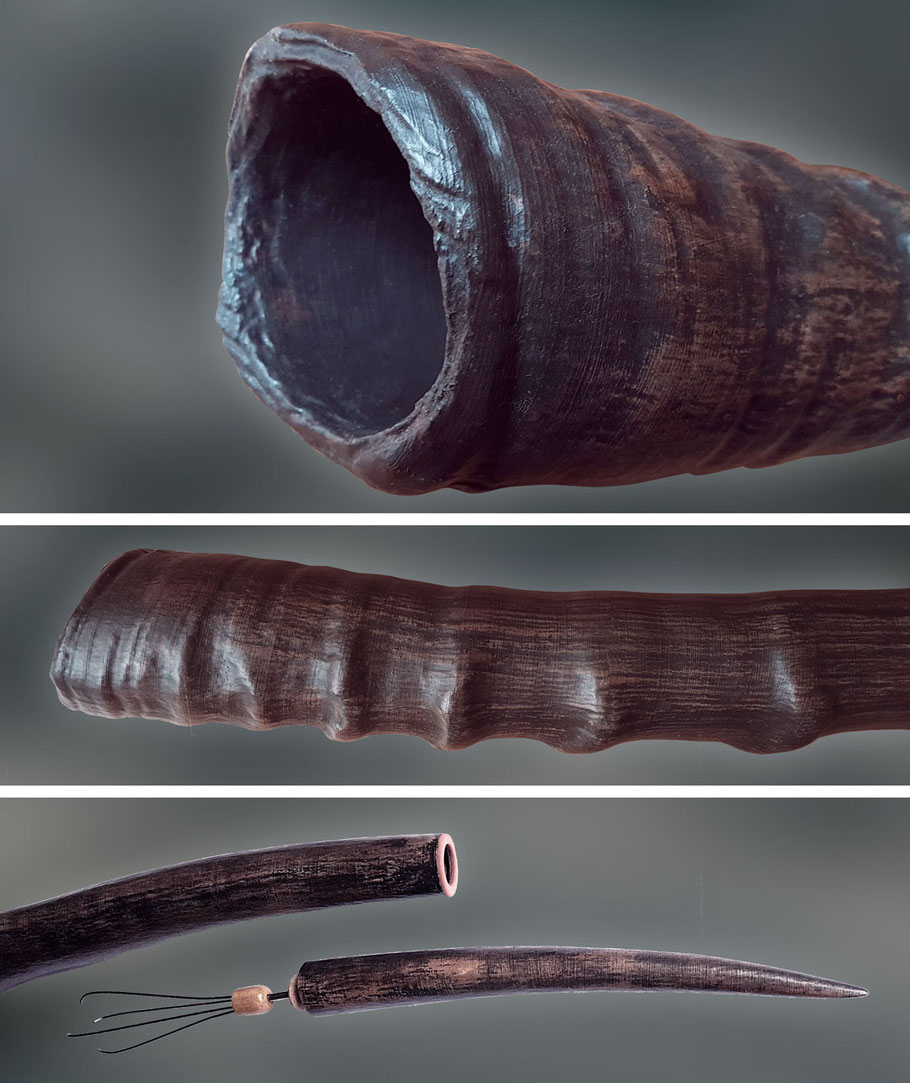
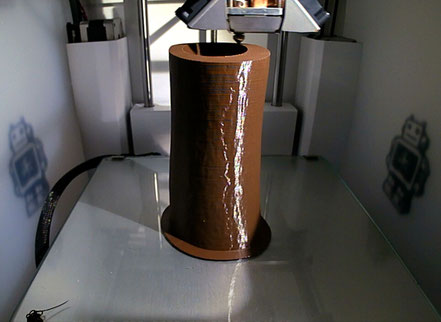
Die folgenden Arbeitsschritte dienten dem Finish - das Instrument sollte ja möglichst wie ein Original aussehen. Dabei kamen im Wechsel Dispersions- und lösungsmittelbasierte Farbstoffe und Lacke zum Einsatz. Um das Horn komplett zu machen, habe ich das spitze Ende mit einem Steck-Adapter für das Mundstück versehen - als optisches Highlight für Ruhephasen.
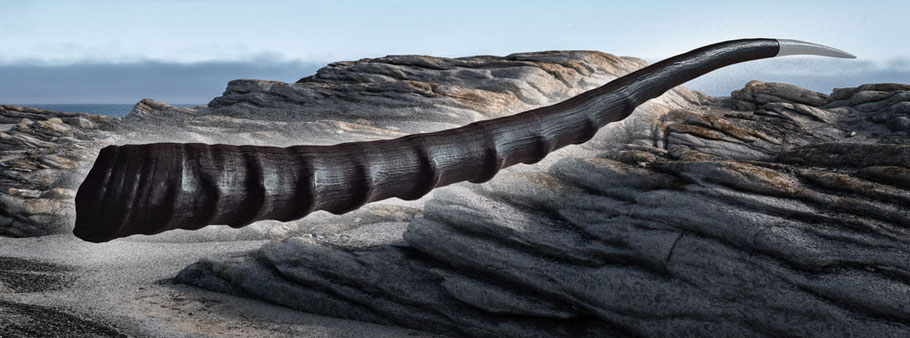
Das fertige Instrument sieht genauso aus, wie ich es haben wollte.

Die Innenform ist aus der Grafik ersichtlich. Bei einer Länge von 147 cm und einem Bell-Innendurchmesser von 86,1 mm ergibt sich bei dem Instrument der Grundton E.
Soweit der praktische Teil. Viel wichtiger als ein weiteres schönes Didgeridoo ist uns als Team jede zusätzliche Erkenntnis zur Verbesserung der CADSD-Software.
Die Präzision der Berechnungen wurde von Frank immer wieder optimiert und ist inzwischen eine sehr genaue Vorhersage des Klangspektrums möglich - bei Einhaltung der Formdaten. Gut, dass es zur
Prüfung von offenen Fragen den relativ günstigen und sehr präzisen 3D-Druck gibt. So ist eine Nachjustierung jederzeit möglich.
Offen war bisher die Frage, warum ein projektierter Sington manchmal weniger hörbar ist als erwartet, trotz ansonsten sauber verwirklichten Obertonspektrums.
Wir wollten dieses Bauexperiment nutzen, um die Vorhersagen in diesm Punkt zu verbessern. Frank erläutert im nächsten Abschnitt die Details.
Experimentelle Überprüfung der Parameter die zu verstärkt singenden Obertönen führen
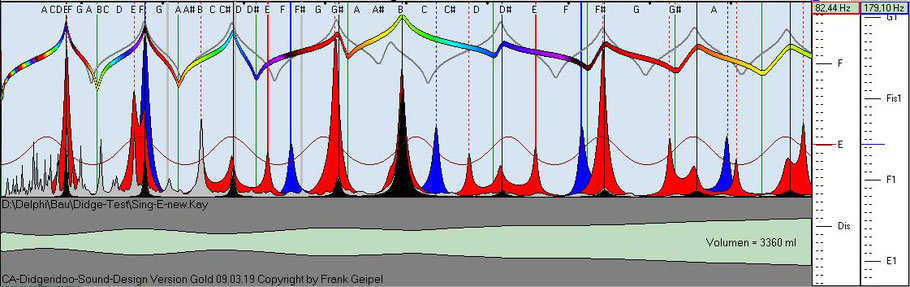
Bei der Projektierung von Wunsch-Klang-Didgeridoos wird oft davon ausgegangen, dass hohe Eingangsimpedanzpeaks am Mundstück (siehe schwarzes Impedanzspektrum), die mit Frequenzen von Obertönen
(siehe rotes Klangspektrum des Grundtones) zusammentreffen, auch zu verstärkt hörbaren Obertönen führen.
Dies konnte leider nur selten in gebauten Didgeridoos bestätigt werden. Oft waren sogar Obertöne besonders gut wahrnehmbar, wenn diese nur mit kleinen Eingangsimpedanzpeaks zusammentrafen.
Um diese Beobachtung in einem experimentellen Instrument zu überprüfen, projektierten wir ein Didgeridoo, bei dem ein kleiner Eingangsimpedanzpeak auf die 5. Harmonische und ein großer
Impedanzpeak auf die 6. Harmonische des Grundtones trafen und fertigten dieses über 3D-Druck.
Die experimentelle Überprüfung durch akustische FFT-Analyse würde zeigen, ob die 5. oder 6. Harmonische lauter wahrnehmbar ist.
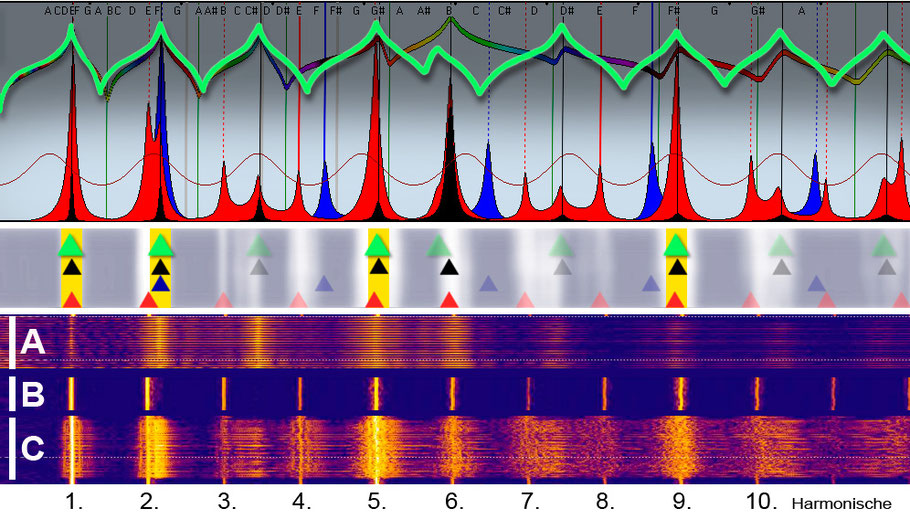
Die im unteren Teil der Graphik gezeigte FFT-Analyse des gemessenen Grundtonspektrums zeigt eindeutig, dass die 5. Harmonische wesentlich lauter als die 6. Harmonische wahrnehmbar ist.
Bereich A: Geschlossener Anschlag auf das Mundstück (Impedanzspektrum)
Bereich B: sauber angespielter Grundton (Klangspektrum)
Bereich C: dynamisch gespielter Grundton (Klangspektrum)
Dieses Ergebnis führt zu folgenden Schlussfolgerungen:
Hohe Eingangsimpedanzpeaks führen zu stehenden Wellen im Instrument, die zur besseren Anspielbarkeit dieser Frequenzen als Trompetentöne führen, sind aber keine Garantie für gut wahrnehmbare
Obertöne an diesen Frequenzen.
Da für eine bessere Wahrnehmbarkeit spezieller Obertöne hohe Schallschnellen am Bellend erforderlich sind, sollten dort die Bellend-Impedanzen nur minimal bzw. Admittanzen am Bellend maximal
sein. Dies ist oft mit kleinen Eingangsimpedanzpeaks am Mundstück korreliert.
Das berechnete Admittanzspektrum am Bellend (grüne Kurve) zeigt, dass beim Zusammentreffen der Obertonfrequenzen
(rote Dreiecke) mit den Maxima der Admittanzen am Bellend (grüne Dreiecke) diese Obertöne lauter wahrnehmbar sind, da unter diesen Bedingungen die
Übertragung der Schallenergie an die Umgebungsluft optimal ist.
Das trifft in diesem Fall bei der 1., 2. (partiell), 5. und 9. Harmonischen zu, bei der 6. Harmonischen jedoch nicht.
3D printing / Springbuck horn brings new knowledge / 20.05.2021
My new 3D-print should look like the horn of a fictional prehistoric antelope (scale approx. 6:1 compared to living specimens) - CADSD optimized, of course. After a short, intensive study of the general variety of horns, I decided on a springbuck horn. An old original for the 3D scan was quickly found.
After a few modifications, the scan seemed to me ideally suited for the construction of a didgeridoo - the adjustments for the instrument construction were limited to a length scaling and the straightening of an area bent from the top/bottom view. The side view and the complete surface structure remained unchanged. Only minor revisions were necessary on the bell.
The outer shape was designed in such a way that the planned CADSD inner shape plus a minimum wall thickness of 8mm fit exactly into it. Some readers might find it interesting to note that inner shapes can be bent without changing the sound spectrum. It is crucial that the joints are in the center of the respective cross-sections.


The 3D printing with dark brown bio-PLA was carried out as usual in several parts, layer height this time: 0.15mm. I adjusted the filling between 60% and 100% depending on the wall thickness and the load on the connecting surfaces. All contact surfaces were subsequently prepared with holes for optimal adhesive connections.

The following work steps were used for the finish - the instrument should look like an original as much as possible. Dispersion-based and solvent-based dyes and varnishes were used alternately. To complete the horn, I provided the pointed end with a plug-in adapter for the mouthpiece - as a visual highlight for periods of rest.

The finished instrument looks exactly how I wanted it.
The inner shape can be seen from the graphic. With a length of 147 cm and a bell inner diameter of 86.1 mm, the instrument has the fundamental drone E.
That is the practical part. Much more important to us as a team than another beautiful didgeridoo is any additional knowledge to improve the CADSD software.
The precision of the calculations has been optimized again and again by Frank and a very precise prediction of the sound spectrum is now possible - if the shape data is adhered to. It's good that
there is relatively inexpensive and very precise 3D printing for checking open questions. Readjustment is possible at any time. So far, the open question was why a projected singing tone is
sometimes less audible than expected, despite the otherwise cleanly realized overtone spectrum.
We wanted to use this building experiment to improve the predictions on this point. Frank explains the details in the next section.
Experimental examination of the parameters that lead to amplified singing overtones (harmonics)
When planning custom-sound didgeridoos, it is often assumed that high input impedance peaks at the mouthpiece (see black impedance spectrum) that coincide with frequencies of overtones/harmonics
(see red sound spectrum of the fundamental tone) also lead to more audible overtones/harmonics. Unfortunately, this could only rarely be confirmed in built didgeridoos. Often, overtones/harmonics
were particularly well perceptible even if they only coincided with small input impedance peaks.
In order to check this observation in an experimental instrument, we planned a didgeridoo in which a small input impedance peak hit the 5th harmonic and a large impedance peak hit the 6th
harmonic of the fundamental tone, and produced this using 3D printing.
The experimental verification by acoustic FFT analysis would show whether the 5th or 6th harmonic can be heard louder.

The FFT analysis of the measured fundamental drone spectrum shown in the lower part of the graphic clearly shows that the 5th harmonic is much louder than the 6th harmonic.
Area A: Closed strike on the mouthpiece (impedance spectrum)
Area B: Cleanly played fundamental drone (sound spectrum)
Area C: Dynamically played fundamental drone (sound spectrum)
This result leads to the following conclusions:
High input impedance peaks lead to standing waves in the instrument, which result in better playability of these frequencies as trumpet tones, but are no guarantee for easily perceptible
harmonics at these frequencies.
Since high sound velocities at the bell end are required for better perceptibility of special overtones/harmonics, the bell end impedances should only be minimal there and the admittances at the
bell end should be maximum. This is often correlated with small input impedance peaks at the mouthpiece.
The calculated admittance spectrum at the bell end (green curve) shows that when the overtone/harmonic frequencies (red triangles) align with the
maxima of the admittances at the bell end (green triangles), these
overtones/harmonics can be heard louder, as the transfer of sound energy to the ambient air is optimal under these conditions.
In this case, this applies to the 1st, 2nd (partial), 5th and 9th harmonics, but not to the 6th harmonic.