
News/Archiv
2025
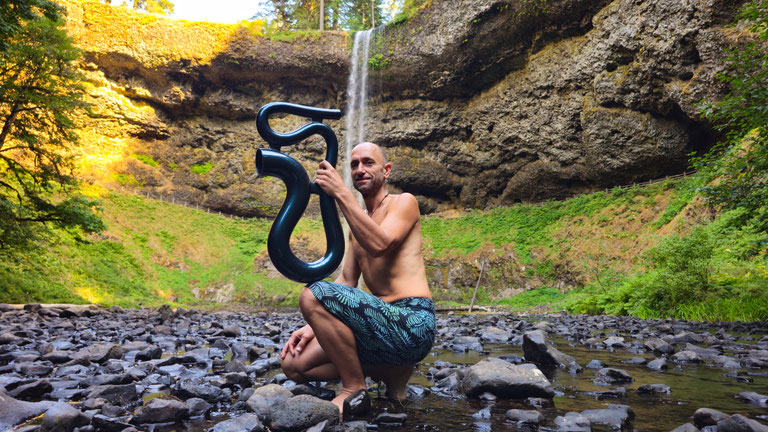
Die Story von "El Pastor" / Dan Flynn 20.08.2025
Das Video wurde am „Looking Glass Rock“ in der Nähe von Moab, Utah, aufgenommen.
Die ursprüngliche Motivation für dieses Didge war, ein Instrument mit starken- Mischton (Heterodyn) Verstärkungseffekten zwischen verschiedenen Frequenzen von Stimme und Instrument zu entwickeln.
Der erste Entwurf stammt aus dem Jahr 2017 und hatte die folgenden Grund-, Toot- und offenen Flötentöne im spielbaren Bereich (offene Töne sind in Klammern angegeben):
"El Pastor" Version 1: D2, (A2), F#3, (A3), C4, (D4), E4, (G4), A4, (B4), C5, (D5), E5, (F5), F#5

In dieser Anordnung hatten die Frequenzen des 1., 2. und 3. Toots (F#3, C4, E4) alle den Heterodyn-Verstärkungseffekt (beim parallelen Stimmeinsatz jeweils quintenweise über den spielbaren
Tönen). Wenn man beispielsweise beim Spielen der Grundfrequenz (f) gleichzeitig die Frequenz des zweiten Tons (C oder 3,5f) vokalisiert, ist eine Differenzfrequenz zu hören, die der Frequenz des
ersten Tons Fis entspricht (3,5 - 1 = 2,5f). Außerdem ist eine Summenfrequenz beim dritten Ton E zu hören (3,5 + 1 = 4,5f).
Beim melodischen Spielen dieses Instruments erinnerte mich der Klang an eine Alphornmelodie namens „Hirtenmelodie“. Deshalb nannte ich dieses Didge „El Pastor“ („Er ist ein Hirte“).
Das Problem war jedoch, dass der resultierende Querschnittsverlauf im Instrument nicht sehr glatt war, da drei Heterodyne Verstärkungsfrequenzen wie hier hintereinander und die offenen Töne bei
den von mir angegebenen Frequenzen (A2 und A3) erzeugt werden mussten. Der Schallbecher (Bell) war im Vergleich zum Rest des Instruments recht groß, und der Hals war zu eng.
Daher bat ich Frank 2020, weitere gezielte Evolutionen durchzuführen. Dieses Mal ließ ich die zuvor festgelegten offenen Töne weg und ließ den ersten Toot auf der Oktave D (2f) statt auf der
großen Terz (Fis, 2,5f) liegen. Durch das Aufheben dieser beiden Einschränkungen konnte der Algorithmus eine deutlich glattere Form finden.
Da der daraus resultierende Querschnittsverlauf relativ glatt war, erkannte ich, dass es vielleicht möglich wäre – ohne diesen zu sehr zu beeinträchtigen –, auch hörbare Obertonwobble Muster
zwischen den Harmonischen 6 und 7 (Obertöne 5 und 6) und vielleicht auch den Harmonischen 9 und 10 (Obertöne 8 und 9) hinzuzufügen. Also bat ich Frank, eine weitere Evolutionen durchzuführen. Das
Ergebnis ist das aktuelle Instrument:
"El Pastor" Version 2: D2, (G2), D3, (G3), C4, (D4), E4, (G4), A4, (B4), C5, (D5), E5, (F5), Fis5

Der Querschnittsverlauf blieb sehr glatt und der Grundton spricht sehr gut an, mit einem perfekten Gegendruck.
Interessanterweise blieben die offenen Flötentöne unbestimmt und folgten weitgehend demselben Muster wie in der ersten Version, mit der Ausnahme, dass die ersten beiden sich bei (G2) und (G3)
einstellten. Damit liegen sie in einer musikalischen reinen Quarte über dem Bordun. Für zeitgenössische melodische Spielweisen, die neben Grundton und Toots auch die offenen Flötentöne verwenden,
führt dies dazu, dass sich die offene Position G – also nicht der Grundton – wie der musikalische Grundton anfühlt. Die offene Position kann wie eine Basisnote wirken, an dem eine Melodie
entsteht. Beim melodischen Spiel mit Betonung des Grundtons also der geschlossenen Position wird die mixolydische Tonart erzeugt. Alternativ wird beim melodischen Spiel, bei dem man zur offenen
Position (G) zurückkehrt, die Dur-Tonart erzeugt.
Abgesehen von diesen melodischen Möglichkeiten gefällt mir an diesem Instrument vor allem die Art und Weise, wie die kleine Septime (C) und die große Sekunde (E) zum Vorschein kommen – sowohl als
heterodyner Verstärkungseffekt (Mischton Verstärkungseffekt) beim Singen mit den Frequenzen des zweiten und dritten Toots als auch als kräftige, wobbelnde Singtöne bei der 7. und 9. Harmonischen
(6. und 8. Oberton).
Für mich bedeutet dieses Didge eine enorme Lernkurve. Während meine früheren Designanfragen eher ein Schuss ins Blaue waren (und fast immer überspezifiziert), versuche ich jetzt, diesem Prinzip
zu folgen: Bei der ersten Suche weniger Frequenzen vorgeben. Aus den Suchergebnissen für ein minimal spezifiziertes Ziel wird geprüft, welche Frequenzen am harmonischsten zusammen auftreten
sollen, und dann eine Auswahl getroffen, mit nur geringen Abweichungen vom festgelegten, harmonischsten Optimum unter minimalen Spezifikationen. Es geht jetzt weniger darum, meine gewünschten
Tonleitern von oben nach unten durchzusetzen, sondern vielmehr darum, herauszufinden, welche Frequenzen bei einer gegebenen minimalen Spezifikation mit optimaler Harmonie zusammen auftreten
sollen und auch physikalisch möglich sind.
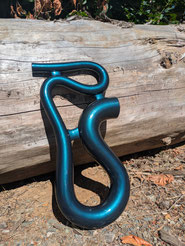
Die im Video gezeigte Version des Instruments wurde von Eldar Blau gefertigt. Die Saxophonform erweitert die melodischen Spielmöglichkeiten, da sie ein schnelles Hin- und Herwechseln des Didges zwischen offenen und geschlossenen Tönen ermöglicht. „El Pastor“ ist in Kürze auf saxo-didge.com erhältlich.


Das gewisse Etwas…
Klang-Rekonstruktion per CADSD – Das F#-Projekt / Ansgar Stein 24.06.2025
Nach meinem ersten Workshop bei Milkay M. im Jahre 2002 wollte ich mir ein Instrument bauen, mit dem sich die Eindrücke und Inspirationen aus dem Workshop leichter nachvollziehen lassen. Es sollte meinen Ansprüchen und Vorstellungen eines traditionellen „Yidaki-Klanges“ entsprechen: Ein enger Hals, eine angenehm organisch-konische Form, eine nicht allzu ausladende Bell.
Die Glasfaserbautechnik für Didgeridoos war damals noch recht neu, die Methode des Baus mithilfe von Negativformen aus
mit Streugut gefüllten Säcken war uns damals noch unbekannt.
Also baute ich mir ein Instrument in einer Art „Wickelstabmethode“:
Zunächst habe ich ein zwei Zentimeter dickes und zwei Meter langes Aluminiumrohr mit Stoffstreifen umwickelt, bis es eine „organische“ Form hatte. Dann legte ich eine Schicht Alufolie darüber,
die sich etwas in Form drücken ließ. Abschließend habe ich das ganze Gebilde mit geschmolzenem Wachs einpinselt.
Fertig war ein Klangkanal, der meinen Ansprüchen zu genügen schien. Diese Form habe ich dann mit Glasfaserstücken laminiert.
Zum Entformen habe ich dann zunächst den Stab herausgezogen, dann die Stoffbahnen, und zum Schluss das ganze mit kochendem Wasser ausgegossen, sodass sich die Alu-Folie gelöst hat und zusammen
mit dem Wachs herausgeschmolzen ist.
Zu meiner eigenen absoluten Überraschung hat wohl alles zusammengepasst:
Das Instrument ist ein echtes Unikat und erfüllt alle meine Vorstellungen und Wünsche!
Nicht nur bietet es für mich ein ausbalanciertes Ansprechverhalten, auch sind die erst später von Frank Geipel beschriebenen sogenannten „harmonischen Wobbles“ prägnant, ein spezielles Klangbild
mit einem „klingelnden“ Obertonwechsel bei bestimmten Spieltechniken.

Mit dieser Beurteilung war ich nicht allein, wie ich bald darauf feststellen sollte: Ich nahm das Instrument mit zum Rripangu-Yidaki-Festival im Schwarzwald, wo es unter den Mitgliedern der anwesenden Yolngu-Familie (Gurruwiwi) herumgereicht wurde. Zwei der Jungs haben sich köstlichst darüber amüsiert, dass ein solches Instrument überhaupt existieren kann, Djalu’ hat mir zwei verschiedene Spielweisen auf dem Instrument vorgeführt, Larry lehrte mich den Rhythmus meines Lieblingsstückes. Der ebenfalls anwesende Australier Guan Lim, ein Förderer traditioneller Spielweisen, hat es ausführlich getestet und einige Jahre später hätte mir der Brite Kyle Maplesden, seinerseits ein weißer Didgeridoospieler mit einem gewaltigen Hintergrundwissen zum traditionellen Spiel, das Instrument fast sofort abgekauft.
Zwischenzeitlich war von Kay Reimer die Methode der Volumenvermessung und des Nachbaus von vorhandenen Instrumenten entwickelt worden, was ich auch bei diesem Instrument machen wollte, bevor ich
es aus der Hand geben würde. Zum einen hatte es inzwischen einen unschätzbaren Wert für mich, es war zu meinem Lehrer und Begleiter geworden. Zum anderen wollte ich eine „Sicherungskopie“, die
ich statt des Originals auf Reisen mitnehmen wollte, da das Instrument ja auch gestohlen oder beschädigt werden oder auf einem Flug hätte verloren gehen können.
Ich habe das mit allen anderen meiner Hauptinstrumente ebenfalls so gemacht, und es hat immer zuverlässig funktioniert.
… mit Ausnahme dieses Instrumentes, wie sich herausstellte:
Dieses war nämlich kurz nach dem Bau einmal zerbrochen, weil ich mich damals mit den Materialien noch nicht gut auskannte! Beim erneuten Zusammenkleben müssen sich Hohlräume gebildet haben, die
zwar auf den Klang keinen Einfluss hatten, wohl aber auf die Wassermenge beim Füllen während der Vermessung. Die Messwerte wiesen also z. T. extreme Ausreißer auf. Diese Ausreißer müssen nun nach
Gefühl „geglättet“ werden, bevor ein Replikat gebaut werden kann.
Resultate:
Obwohl die Nachbauten ihrerseits sehr gute Instrumente sind, scheint ihnen ein „gewisses Etwas“ zu fehlen, eine Nuance in der Ansprache. Manchmal erklingt ein störender Oberton, manchmal entsteht
ein dröhnender Beiklang.
Stück für Stück habe ich versucht, die Fehlerquellen einzugrenzen:
• Zum Glück kann die Materialfrage hier ohne die üblichen ermüdenden Diskussionen ausgeschlossen werden: das „Original“
besteht selbst aus Glasfaser.
• Auch die Materialstärke hat sich inzwischen als unerheblich herausgestellt: Sowohl ultraleichte als auch
sehr schwere und/oder dickwandige stabile Kopien weisen dasselbe generelle Klangbild auf.
• Auch habe ich versucht, die Präzision der Form zu erhöhen: Hierzu habe ich unter anderem recht aufwändig den üblichen Formsack aus 5 statt aus 2 Seitenteilen
erstellt. Die erreichte Präzision der Endform ist unglaublich, aber die Idee hatte einen Haken: der Formsack dehnte sich durch den Materialzuwachs an den „Querringen“ merklich in die Länge. Das
Ergebnis ist ein tolles Instrument(!) – es hat aber nicht viel mit dem Original zu tun.
Mit einer Längsstabilisierung hätte sich die Längendehnung verhindern lassen – leider ist der Formsack beim Entformen zerstört worden, und der Aufwand für einen erneuten Versuch schien mir zu
hoch.
• In weiterer Folge hat als aktuellste Entwicklung Kay Reimer einen 3D-Druck anhand der Messwerte (mit geglätteten
Messfehlern) erstellt, den ich mit Glasfaser stabilisiert habe.
Viel präziser ist die gemessene Form kaum noch darstellbar!
Dies geschah dennoch inzwischen nur noch als letzte Bestätigung der bisherigen Beobachtungen: Es weist dasselbe Klangbild auf wie die anderen Replikate.
Simulation
Nun besteht eine der vielen Möglichkeiten, die sich mit CADSD bieten, in der prinzipiellen Möglichkeit, Instrumente auch auf umgekehrtem Wege zu erhalten: Durch Analyse der vorhandenen Frequenzen
und Berechnung eines dazu passenden Volumenprofils. Je mehr Eckwerte von dem jeweiligen Instrument und insbesondere dessen Klangkanal bekannt sind, (z. B. Belldurchmesser, Länge, generelle Form,
Auffälligkeiten wie Ausbeulungen, Dellen, Biegungen etc), desto besser kann dies gelingen.
Dies bietet zumindest theoretisch auch die Möglichkeit, längst verschollene historische Instrumente im Nachhinein simulieren zu können.
Also bat ich Frank Geipel, mir bei einem solchen Prozess zu helfen.
In der Folge entstanden einige Simulationen, von denen ich mit der Formsackmethode Prototypen gefertigt habe. Allen ist gemein, dass sie sehr dicht an das Original heranreichen. Zwei von ihnen
habe ich hier ausgestellt.
Fazit
Allesamt sind es fantastische Instrumente, die auch dem ursprünglichen Anspruch entsprechen, „Trainingsinstrumente“ für traditionelle Spieltechniken zu sein (mit dem Nebeneffekt, dass sie für
westliche Spieltechniken, wie ich sie interpretiere, tatsächlich wenig geeignet sind.)
Aber „dieses letzte Etwas“ scheint ihnen allen zu fehlen.
Zusammenfassend lässt sich also feststellen, dass sich offensichtlich noch nicht alle Parameter durch die Simulation ausreichend erfassen lassen.
Insbesondere z. B. die Überlagerungseffekte einer Reihe sehr kleiner Durchmesseränderungen.
Des Weiteren können die Simulationen nur das „von außen" wahrnehmbare Klangbild erfassen, nicht jedoch das Anspielverhalten, die
Gegendruckverhältnisse (die nach meiner Definition extrem vom Spieler und seinen Voraussetzungen selbst abhängen).
Dieses Thema bleibt also noch weiter Forschungsgebiet, und wir werden weitere Lösungsansätze austesten.
Es gibt viel zu lernen, finden wir’s raus!
Die Instrumente

„Original“
Das ursprüngliche Instrument aus Glasfaserkunststoff (deshalb „Original“ in Anführungszeichen), eine intuitive Formsimulation.
Form 1
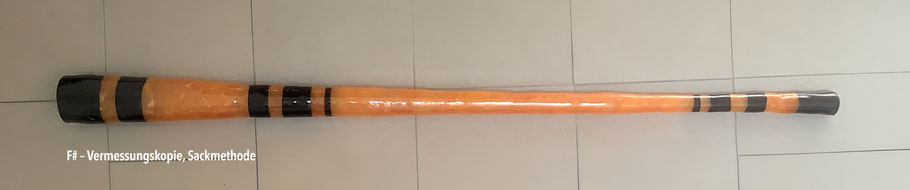
Eine klassische Abformung in der „Sack“methode auf Basis der Messwerte, mit geglätteten Ausreißerwerten. Diese Replikate verwende ich derzeit auf meinen Lifekonzerten, das abgebildete Instrument
war die erste Generation der Konzerte mit RA-Men.

Form 2
Der „Fünftelsack“-Versuch, mit wesentlich weniger geglätteten Werten.
Durch die Erhöhte Beweglichkeit der Sackform zog sich die Form in die Länge (Tonhöhe F). Dadurch entspricht das Endergebnis zwar nicht direkt dem Ziel, es ist aber für sich ein fantastisches
Instrument!

3D-Druck
Ein Formdruck auf Basis der Messwerte, mit geglätteten Ausreißerwerten, stabilisiert mit einem Glasfasermantel.

Simulation 1
Etwas offenerer Klangkanal, klanglich extrem dicht an den ersten Replikaten.
Es lässt sich ohne Klangverlust auch recht dünn bauen.
Dieses Replikat hat inzwischen eine eigene kleine Fangemeinde gebildet … 😉

Simulation 2
Sehr enger Eingangskanal, ausgerundete Bell. Sehr direkt, laut, mit sehr präsenten Obertönen.
Durch die komplexen Hohlräume entwickelt das Instrument eine derart kräftige Schwingung, dass es mit sehr dicker Wandstärke gebaut werden muss, um störende Vibrationen am Mundstückende zu
vermeiden.
Kommentar von Frank:
Ich freue mich über diesen interessanten Eintrag von Ansgar, denn er zeigt exemplarisch einige nach meiner Meinung wichtige Aspekte auf.
Mathematische Modellierung:
Jedes mathematische Modell ist nur eine Repräsentation des modellierten Objektes oder Prozesses. In diesem Fall der Akustik des Didgeridoo. Da es aus erkenntnistheoretischen Gründen nie möglich
ist, ein originales Objekt oder einen originalen Prozess allumfassend zu beschreiben, wird ein Modell auch nie das Original 100% repräsentieren können. Allerdings ist es möglich sich mit
steigendem Aufwand dem Original immer mehr anzunähern. Beispiele dafür sind mathematische Modelle, mit denen man heutzutage praxistaugliche Flugzeuge entwickelt. Prinzipiell stellt sich immer die
Frage, welchen Aufwand für Softwareentwicklung und Hardware kann und will man sich leisten, um ein bestimmtes Ziel zu erreichen.
Ein Versuch lohnt sich immer:
Auch die CADSD-Software-Tools sind auf Basis vieler Versuche und theoretischem Wissen entstanden. Nur durch Versuche kann man neue Erkenntnisse generieren und somit durch Selbsterfahrung zu
wirklichem Wissen gelangen. Der Versuch von Ansgar zeigt das in beeindruckender Weise. Allerdings hat er mit seinem Erstversuch quasi auch seinen „Jackpot“ gezogen! Manchmal denke ich, es steckt
noch mehr dahinter. Wenn man unbewusst mit innerer Überzeugung und Leidenschaft einen Versuch startet und daran glaubt, wird der Tüchtige oft auch mit unerwartetem Erfolg belohnt. Das führt uns
zum nächsten Punkt.
Erwartungsmanagement:
Wenn eine innere Stimme sagt: „Ich baue mir mein Instrument.“ … dann fangen sie an und starten diesen Versuch. Aber bleiben sie offen und treiben ihre Erwartungen nicht künstlich zu hoch. Denn
dann steigt die Wahrscheinlichkeit für eine Enttäuschung im wahrsten Sinne des Wortes Ent-Täuschung. Aber selbst das Erkennen, dass man sich getäuscht hat, ist eine gute Erfahrung, die uns
weiterbringt.
Vergleich:
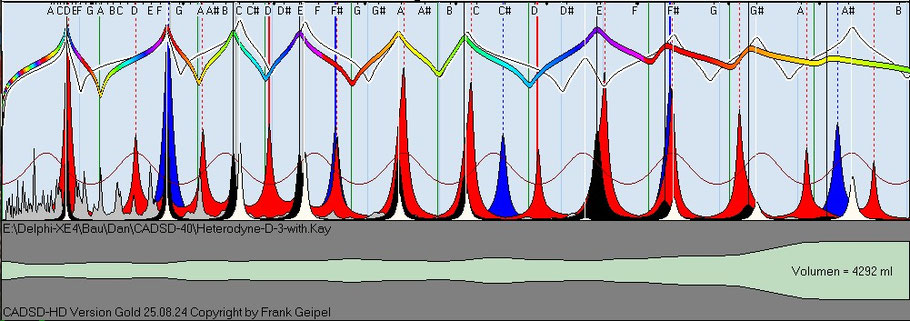
Klang- und FFT-Vergleich des [1] „Original“ und [2] 3D-Druck Instrumentes eingespielt von Ansgar.
Der wahrnehmbare Unterschied ist in der minimal lauter anklingenden 7.Harmonischen (6.Oberton) des Grundtones begründet (siehe kleiner blauer Pfeil).

The story of "El Pastor" / Dan Flynn 20.08.2025
The video was recorded at „Looking Glass Rock“, near Moab, Utah.
The original motivation for this didge was that I wanted a didge with strong heterodyne amplifying effects between various frequencies. Its first design was in 2017 and had the following
drone, toots and open-tones in the playability range (open-tones are designated in parentheses):
"El Pastor" V1: D2, (A2), F#3, (A3), C4, (D4), E4, (G4), A4, (B4), C5, (D5), E5, (F5), F#5
In this arrangement, the frequencies of the 1st, 2nd and 3rd toots (F#3, C4, E4,) all had the heterodyne amplifying effect. For instance, while droning the fundamental frequency
(f), if you simultaneously vocalize at the frequency of the 2nd toot (C, or 3.5f), then a difference frequency will be heard which is the frequency of the 1st toot F# (3.5 - 1 = 2.5f). Also
a sum frequency would be heard at the 3rd toot E (3.5 + 1 = 4.5f).
When playing this instrument melodically, the sound reminded me of an Alpenhorn tune called "Shepherd's Melody". So I named this didge "El Pastor".
The problem, however, was that, in order to have three heterodyne amplifying frequencies all in a row like this, and to have the open tones at the frequencies which I specified (A2 and A3), the resulting bore was not very smooth. The bell was quite large compared to the rest of the instrument, and the neck was too constricted.
So in 2020 I asked Frank to run another directed evolution, this time omitting the previously specified open tones, and allowing the first toot to be at the octave D (2f) instead of at the Major Third (F#, 2.5f). By releasing these two constraints, the algorithm was able to find a much smoother form.
With the bore so smooth, I realized that maybe it would be possible--without disturbing too much the smoothness--to also add some audible harmonic wobble between harmonics 6 and 7 and perhaps also 9 and 10, so I asked Frank to run yet another evolution. The result is the current instrument:
"El Pastor" V2: D2, (G2), D3, (G3), C4, (D4), E4, (G4), A4, (B4), C5, (D5), E5, (F5), F#5

The bore remainend plenty smooth and the drone is very responsive, with a perfect amount of backpressure.
Interestingly, allowing the open tones to remain unspecified, they settled into mostly the same pattern as in the first version, except the first two ended up at (G2) and (G3). This puts
them at a musical Perfect Fourth above the drone. For contemporary melodic playing styles which use the open tones in addition to drone and toots, the result of this is that the open
position G--not the drone--feels like the musical tonic or root. The open position can seem like "home", i.e., where a melody resolves. When playing melodically with emphasis on the
drone, or closed position, it is the Mixolydian sound that is evoked. Alternatively, when playing melodically but coming home to the open position (G), it is the Major Scale that is
evoked.
But apart from these melodic possibilities, really my favorite feature of this instrument is the way the Minor Seventh (C) and Major Second (E) show up--both as a heterodyne-amplifying effect
when vocalizing at the frequencies of the 2nd and 3rd toots, and as strong, wobbly singing tones at the 7th and 9th harmonics.
To me this didge represents a major learning curve. Whereas my older design requests used to be a kind of shot in the dark (and almost always overspecified), now I try to follow this
principle: Specify fewer frequencies ahead of time when doing an initial search. From the search results for a minimally-specified target, see which set of frequencies "want" to occur
together in the smoothest way, and then select from among them, with only slight deviations from the established smoothest optimum under minimal specifications. It is now less about
top-down imposing my desired musical scales and more about discovering which set of frequencies "want" to occur together for a given minimal specification with optimal smoothness.
The actual version of the instrument in the video was crafted by Eldar Blau. The saxophone shape enhances the melodic playing possibilities as it permits rapid movement of the didge back and forth between open and closed tones. El Pastor will soon be available at saxo-didge.com.


That certain something...
Sound reconstruction via CADSD - The F# project / Ansgar Stein 24.06.2025
After my first workshop with Milkay M. in 2002, I wanted to build myself an instrument that would make it easier to reproduce the impressions and inspirations from the workshop. It should meet my requirements and ideas of a traditional "Yidaki sound": A narrow neck, a pleasantly organic-conical shape, a bell that is not too expansive.
The fiberglass construction technique for didgeridoos was still quite new at the time, and the method of building
using negative molds made from bags filled with rice was still unknown to us.
So I built myself an instrument using a kind of "wrapping rod method":
First, I wrapped a two centimeter thick and two meter long aluminum tube with strips of fabric until it had an "organic" shape. Then I put a layer of aluminum foil over it, which could be pressed
into shape. Finally, I brushed the whole structure with melted wax.
The result was a sound channel that seemed to meet my requirements. I then laminated this shape with pieces of fiberglass.
To demold, I first pulled out the rod, then the fabric strips, and finally poured boiling water into the whole thing so that the aluminum foil came loose and melted out together with the wax.
To my own absolute surprise, everything seemed to fit together:
The instrument is truly unique and fulfills all my expectations and wishes!
Not only does it offer a balanced response for me, but the so-called "harmonic wobbles", a special sound with a "ringing" overtone change in certain playing techniques described later by Frank
Geipel, are also striking.

I was not alone in this assessment, as I was soon to discover: I took the instrument with me to the Rripangu Yidaki Festival in the Black Forest, where it was passed around among the members of the Yolngu family (Gurruwiwi) in attendance. Two of the guys were amused that such an instrument could even exist, Djalu' showed me two different ways of playing the instrument, Larry taught me the rhythm of my favorite piece. The Australian Guan Lim, who was also present and a promoter of traditional playing methods, tested it extensively and a few years later the Brit Kyle Maplesden, himself a white didgeridoo player with a vast background knowledge of traditional playing, almost bought the instrument from me immediately.
In the meantime, Kay Reimer had developed the method of measuring volumes and rebuilding existing instruments, which I also wanted to do with this instrument before I let it go. For one thing, it
had become invaluable to me and had become my teacher and companion. Secondly, I wanted a "backup copy" to take with me on trips instead of the original, as the instrument could have been stolen,
damaged or lost on a flight.
I have done the same with all my other main instruments and it has always worked reliably.
... with the exception of this instrument, as it turned out:
This one had broken shortly after construction because I wasn't very familiar with the materials at the time! When it was glued together again, cavities must have formed, which had no effect on
the sound, but did affect the amount of water when filling during the measurement. The measured values therefore showed some extreme outliers. These outliers must now be "smoothed out" by feel
before a replica can be built.
Results:
Although the replicas themselves are very good instruments, they seem to lack a "certain something", a nuance in their response. Sometimes there is an annoying overtone, sometimes a booming
overtone.
Bit by bit, I have tried to narrow down the sources of error:
- Fortunately, the material issue can be ruled out here without the usual tedious discussions: the "original" itself is made
of fiberglass.
- The thickness of the material has also proved to be irrelevant: Both ultra-light and very heavy and/or thick-walled stable
copies have the same general sound characteristics.
- I also tried to increase the precision of the mold: Among other things, I created the usual mold bag from 5 instead of 2 side parts. The precision achieved in the final mold is incredible, but
the idea had a catch: the mold bag stretched noticeably in length due to the increase in material on the "cross rings". The result is a great instrument(!) - but it doesn't have much to do with
the original.
Longitudinal stabilization would have prevented the elongation - unfortunately, the mould bag was destroyed during demoulding and the cost of trying again seemed too high.
- Subsequently, Kay Reimer created a 3D print based on the measured values (with smoothed measurement errors), which I
stabilized with glass fibre.
The measured shape can hardly be represented much more precisely!
However, this was only done as a final confirmation of the previous observations: It has the same sound pattern as the other replicas.
Simulation
Now, one of the many possibilities offered by CADSD is the ability to obtain instruments in the opposite way: By analyzing the existing frequencies and calculating a matching volume profile. The
more parameters are known about the respective instrument and its sound channel in particular (e.g. bell diameter, length, general shape, anomalies such as bulges, dents, bends, etc.), the better
this can be done.
At least in theory, this also offers the possibility of simulating long-lost historical instruments retrospectively.
So I asked Frank Geipel to help me with such a process.
As a result, several simulations were created, of which I produced prototypes using the mold bag method. What they all have in common is that they are very close to the original.
Conclusion
All of them are fantastic instruments, which also fulfill the original claim of being "training instruments" for traditional playing techniques (with the side effect that they are actually not
very suitable for Western playing techniques, as I interpret them).
But they all seem to lack "that last something".
In summary, it can therefore be said that not all parameters can be adequately captured by the simulation yet.
In particular, for example, the superimposition effects of a series of very small diameter changes.
Furthermore, the simulations can only capture the „externally" perceptible sound image, but not the playing behavior, the counter-pressure conditions (which, according
to my definition, are extremely dependent on the player and his conditions).
This topic will therefore remain an area of research and we will continue to test further solutions.
There's a lot to learn, let's find out!
The instruments

„Original“
The original instrument made of fiberglass (hence "original" in quotation marks), an intuitive shape simulation.

Form 1
A classic replica using the „bag" method based on the measured values, with smoothed outlier values. I currently use these replicas on my live concerts, the instrument shown was the first generation of concerts with RA-Men.

Form 2
The „five-part bag" experiment, with much less smoothed values.
Due to the increased flexibility of the bag shape, the shape became longer (pitch F). Although the end result does not correspond directly to the target, it is a fantastic instrument in its own
right!
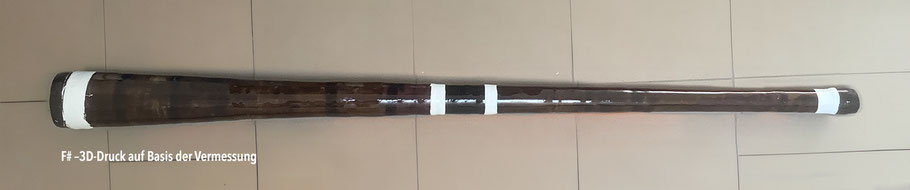
3D printing
A form print based on the measured values, with smoothed outlier values, stabilized with a glass fibre jacket.

Simulation 1
Slightly more open sound channel, extremely close in sound to the first replicas.
It can also be built quite thin without any loss of sound.
This replica has now formed its own small fan community ... 😉

Simulation 2
Very narrow input channel, rounded bell. Very direct, loud, with very present overtones.
Due to the complex cavities, the instrument develops such a powerful vibration that it has to be built with very thick walls in order to avoid disturbing vibrations at the end of the
mouthpiece.
Comment from Frank:
I'm pleased with this interesting post from Ansgar, as it highlights some aspects that I consider important.
Mathematical modeling:
Every mathematical model is only a representation of the modeled object or process. In this case, the acoustics of the didgeridoo. Since, for
epistemological reasons, it is never possible to describe an original object or an original process in its entirety, a model will never be able to represent the original 100%. However, it is
possible to get closer and closer to the original with increasing effort. Examples of this are mathematical models that are used today to develop practical aircraft. In principle, the question
always arises as to how much effort for software development and hardware one can and wants to afford in order to achieve a certain goal.
It's always worth trying:
The CADSD software tools were also developed on the basis of many experiments and theoretical knowledge. You can only generate new insights through
experimentation and thus gain real knowledge through self-experience. Ansgar's experiment demonstrates this in an impressive way. However, he also hit the jackpot with his first attempt!
Sometimes I think there is more to it than that. If you unconsciously start an attempt with inner conviction and passion and believe in it, the hard-working person is often rewarded with
unexpected success. This leads us to the next point.
Expectation management:
When an inner voice says: “I'm going to build my instrument.” ... then get started and make the attempt. But keep an open mind and don't artificially
raise your expectations too high. Because then the likelihood of disappointment increases, in the truest sense of the word dis-appointment. But even recognizing that you were wrong is a good
experience that helps us move forward.
Comparison:
Sound and FFT comparison of the [1] “original” and [2] 3D printed instrument recorded by Ansgar.
The perceptible difference is due to the slightly louder 7th harmonic (6th overtone) of the fundamental tone (see small blue arrow).
